Friday, July 31, 2009

Pulled through and twisted out!

Yikes!!!!!! Where have the days gone? I feel like I have been working and practicing the violin with my daughter and nothing else! That means it's time to make time. Does that make any sense?

This is actually yesterday's hair-do. We had stopped at a little convenient store after violin lessons to let my daughter pick out a treat for practicing so hard this week. Not to mention she had such a great attitude about it and wanted to only work on the things she actually needed work on. Most of the time it seems like they want to take the easy way out...but she really wants to learn. She has done gymnastics and ballet and this is the first thing she has actually really loved:) She talks about it all the time and we practice 6 days a week. Well it was so cute, because we were standing next to 2 teenage girls and one of them said "that has to be one of the coolest hair-dos I've ever seen in my life". My daughter thought it was the coolest thing that TEENAGE girls liked her hair:)
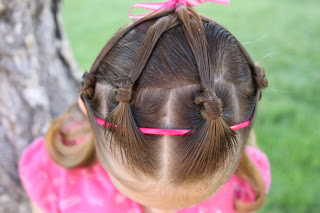
We started with regular ol' piggy tails.
Next we did a pull through knot on each side.
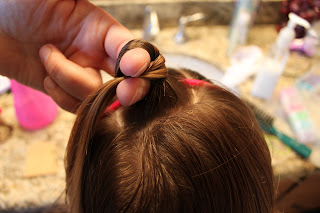
Take the hair from the ponytail and split it into 2 pieces.
Using those 2 sections twist both sections out. (The left one left and the right one right.)

Twist until tight and hook with an elastic. We repeated this 2 more times. You may need more or less depending on how long your daughter's hair is.
We curled under the ends and added some hair things.
Close-up/Side View
Side View
Close-up from the front
An adorable front view! I think I just might die without her:)
For fun we threw in a picture of how her nails looked today!

Tuesday, July 28, 2009

A birthday do....for Liza Loo!

Today is my daughter's best friend's birthday! If you are a regular follower you will recognize her cute face! If not you can see her here...here...and now here! Today she Turns 8. So I would like to wish her a Happy 8th Birthday! My daughter slept over at her house and got to attend her birthday party and now today a couple of the girls get to go to a fun place called Kangaroo Zoo! I am so glad they are friends. You know how you don't always like your kids friends? Well I actually LOVE Lizzie:) So I feel lucky that they are friends!

She had her family party and I asked her mom ( and my good friend Dawn) if I could do her hair! I gave Lizzie a few choices and this is what she picked!

I started out by making a part from one ear to the other and pulling the hair forward.
Then I slipped the headband over the part. (see my other hairdo similar to this one)

I took a section of hair from both sides of the headband and pulled it up over the headband.
Then I took that piece of hair and tied it into a knot.

Next I clipped it down and out of the way with a barrette.
I did one more on the left and 2 more off to the right side.
After I took the barrettes out I hooked them all together in the back with an elastic.
I curled the hair out and tied a ribbon around the elastic.
Top View
Better View of the front
Side View
Back/Close-up
And of course...last but not least a front view. Happy Birthday you beautiful girl you! Hope all of your birthday Wishes come true.

Monday, July 27, 2009

Princess Jeweliana- A Barbie do!

This hairdo comes from Barbie as the Island Princess. Princess Jeweliana has this simple do in the movie. I had a hard time finding a picture of the back of her head during the movie so I didn't post one! My daughter LOVES all of the Barbie movies. Sadly enough...Yes we do own all of the barbie movies. Although this one is not my favorite of them.


My daughter's hair is not nearly as long or thick as the girls in the movie, but it was so simple and my daughter really wanted me to do her hair like hers...so I did:)

Part the hair down to the ear on each side and braid them.

Connect the 2 braids in the back and then braid that piece too.

Grab all of the hair and pull it down so it is a ponytail, but not a tight ponytail.
Then I curled it under and tied bows around the elastics to cover them up.
Front picture! This was taken months ago. When she was still my kindergarten baby:) Am I the only one taking first grade so hard? Or do other moms cry thinking about their daughter growing up?

Friday, July 24, 2009

Butterfly Bobby Pins

I am not the most talented when it comes to actually making hair things. But there are a few things that I can do that are easy and I thought I would share them with you!

A couple posts ago I posted this hair-do! I added these decorative bobby pins that I had made myself. I really loved how they turned out and they were easy AND fast to make.

You will need a glue gun, a skinny piece of ribbon, a few bobby pins, and some embellishments of your choice (Jolene from Dip Diddly designs gave me mine from Ben Franklin's Craft store) but you can find these sort of things anywhere.

Take your embellishment and add a small strip of hot glue to the back of the embellishment.

Next, take your bobby pin and push it into the hot glue and hold it there for a few seconds.

After it is attached to the back, spread open the bobby pin.
Cut a small piece of ribbon that is not quite as wide as the embellishment. Add another small dollop of glue over the bobby pin and then slide the piece of ribbon up and over the hot glue. Push it onto the back of the embellishment. That should complete your decorative bobby pin.

I only did 3 because that is how many I needed for the hair-do I was using them for.
I added them to her hair, which looked beautiful! So if you are like me and not that good at making hair things, this should be a simple project that you can actually do! My daughter loved helping me make these! Look forward to a few more EASY hair related craft ideas in the future!!! Also if you live in Utah like I do...Happy 24th of July! Hope you all have a wonderful Holiday with your families!

Thursday, July 23, 2009

Chic Clips Giveaway Winners!!!


A few of our favorite things Summer Giveaway Part 3!!! So after long awaiting for some of this cute Hair candy...lets see who the winners are!

Winner #1~#63 MandyMoo76 Who gets to take home 2 of these adorable Minnie Bows!!!

Winner #2~ #90 The Lamps Family Who gets to take home 2 of these Mystical Mermaid Bows!!!

Winner #3/The Grand Prize winner~ #9 Lisa Handly Stewart Yeah for you!!! You have just won a $20 Gift Certificate to Chic Clips Etsy Store!!!

All winners Please e-mail me @ SugarandSpiceHairstyles@gmail.com with your info so I can get your winnings to you!

Originally I said all winners need to contact me within 48 hours...this criteria has changed! I will be out of town this weekend and will be shipping everything on Monday July 27th! So make sure I have your info by that morning or I will be drawing new winners!!!

Monday, July 20, 2009

Checkered Braids

There are only a couple of days left to enter my giveaway going on right now. So if you haven't entered it yet...go check it out!!!

My Husband had surgery last Friday and I have been super busy trying to do all the stuff around the house AND take care of him this weekend. He is doing okay (nothing life threatening). I wanted to post this sooner but life just gets away with me sometimes! Too bad I have to work during the week!


This was pretty simple, and I love the way it turned out. When you do braids up front like this...the options are endless for the next day's hair-do.
Start by parting her hair on both sides down to the middle of her ear, and pull the rest back into a ponytail.

Section out 3 equal sections and then pull the middle one up and out of the way.

I braided 3 braids in the left section.

Then I braided 3 braids in the right section but only part way down.
I braided 4 in the middle section. Once again pulling these up and out of the way.

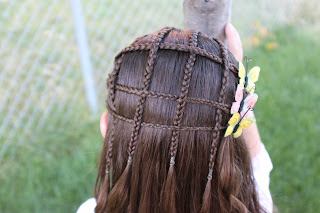
Take the top of the 3 braids on the left side and connect it to the top braid on the right side. Notice I connected them on the back/right side of her head?

Then braid this piece. Add the next braid down on each side into the middle piece. Repeat with the bottom braid on each side.


Grab the 4 braids from the middle section and weave them over and under the sideways braids,(alternating with each braid).

I slipped some decorative bobby pins down into the connection points of the connecting braid to cover the elastics. Curl the hair. I did half ringlets and half partial curls.

Top View

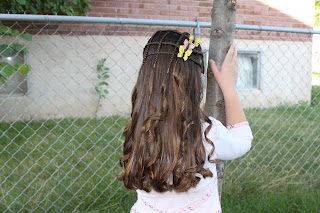
Side/Back View

Close-up of Back View
Side View
Front view.
Can you see my dying plants in the background. Maybe I should spend more time doing yard work and less time doing hair! LOL!