Monday, June 29, 2009

Braided Bead Star

I know, I know.... another Fourth of July hairstyle. Are you getting sick of it yet? Don't worry the fourth is almost here and then I promise I'll move on to other things. For some reason It's so much fun coming up with hair-dos for holidays. If you didn't get to see the first ones see HERE and HERE.

For this hair-do you will need some red, white, and blue beads. Four pieces of pipe cleaner (we used red), and pipe cleaner is super cheap. Last but not least bows, or some Holiday flavored ribbon.


Start with a small section of hair in the front/middle of her head.
Do a pull-through knot.
Make 2 more small ponytails on each side of the first. Do a pull through in each of these as well.

Hopefully everyone knows what a pull through knot is. If not I am going to try and post some Hair basics in Video form, I just have to learn how first:)

Pull the hair from the 3 ponytails out of the way and then do some regular ol' piggy tails.
I took 2 pieces of pipe cleaner and pushed them through the underneath side of the pull through knot. Next I twisted about a 1/2 an inch of the pipe cleaner around itself (see picture above). Split the middle section into 2 pieces.

Make a braid using the pipe cleaner as 1 of the strands.

Each time before I braided the pipe cleaner into the hair I strung on 1 bead alternating the colors.

Secure the left section of the middle piece to the left piggy tail. Do the same thing on the right.

Now move to the outer sections of hair. Braid them using the same technique. Secure the bottom of the outer pieces with an elastic.

Next I took the outer braids and crossed them over to the opposite side piggy tail. Notice I weaved them under the already secured braids. Secure and add your bow or ribbon. I curled her piggy tails under and sprayed with hairspray.

Top View
Side View
Back View
Front View.
If you didn't notice this is one our favorite holidays, and all of these hair-dos are making us excited. Not to mention I get Friday off of work!!! Yeah a three day weekend, and some fireworks, what more could I ask for?

Thursday, June 25, 2009

Sewn Stars and the Giveaway Winners!

Thanks to anyone who entered my Summer Giveaway "Part 2". I love reading peoples comments! I picked the winners through Random.org. Congrats to the winners, who are......

#91- Lisa and #99 Amber. Hey girls neither of you left contact info so I left comments on your blogs!!! Hopefully you get them. I need to hear from you with-in 48 hours or I will draw new winners! Thanks again and don't forget, there will be one more part to my summer giveaway and it WILL be hair-related. Not sure how soon it will be....but soon:)


Here is another idea for those of you feeling patriotic! This was pretty quick and it was cute....not my favorite in the whole world or anything but she really liked the stars! I have several other fourth of July styles, so sorry if you get sick of seeing them!


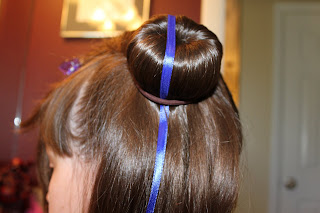
I'm sure many of you have seen these sock buns before, but for those of you who haven't I will explain how I did it. All you do is cut the tip of a sock off and roll it up like in the picture. Roll it up until you can't roll it anymore.

I did her hair is some high piggy tails and slipped the hole of the sock around each one.
Next, take the hair from the piggy tail and wrap it around the sock so it covers it.
To get it to stay I carefully slid a stretchy hair thing over it.


I sectioned off a piece of hair and clipped it out of the way. This piece will be needed to wrap around the base of the bun.


I used this plastic craft needle to thread some thin blue ribbon through.
I slid it under the elastic and tied a knot so the ribbon would not slip off.
Then I used the needle to start sewing a star.
Each time I crossed the ribbon over the bun I only sewed it underneath the elastic.

Once my star was formed I tied the ribbon in another knot around the elastic.
Using the sectioned off piece from earlier I twisted it and then wrapped it around the base of the bun bobby pinning it into place. Repeat on the other side. If you wanted you could always just do 1 bun to cut down on time.

Top View

Side View

Back view


Close-up
She looks like a little Princess Leah in this picture, don't you think?

Monday, June 22, 2009

Flag Flare-for your Hair!

If you haven't entered my giveaway going on right now.....go enter it HERE! Also some of you who entered said you followed my blog, but aren't actually followers. If this is still so when I draw winners your entries will not be counted (Sorry).

I noticed some people doing some fourth of July hair-dos and thought it would be fun to come up with some of my own! And man was it fun brainstorming about it! This has to be my favorite of what I came up with!

A flag sewn into some braids! It was adorable! And despite how it looks it really didn't take that long.

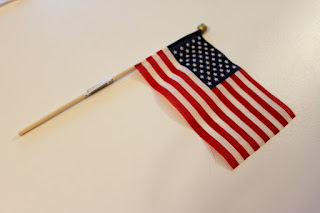
I bought a small flag from the craft store.


I carefully removed the staples that were holding it to the stick.
I parted her hair down the middle and tied the other side off to keep it out of the way.

Start with one small ponytail up front on the left side of her head.
Braid it and hook it into another small ponytail underneath it.

Repeat the last step, so it looks like this.

Do the same thing on the other side. This would also look cute with inside out french braids, but this was easier and faster for me considering my lack of french braiding talent.

I strung a small white ribbon through one of these plastic craft needles.
I pulled it through the flag so the ribbon would run through the flag so I would have a good starting point.

I trimmed the flag so it would fit between the braids and positioned it how I wanted it. Then I starting sewing it to her braids. The needle pushed through the fabric on my flag but you could cut small slits if your material will not allow for this.

I did this on both sides. Then I took the ribbon at the bottom and tied it around each piggy-tail.

I bought this stuff a while ago at the craft store. It's a little silver plastic bead string!?!?
I don't know what it is actually used for, but it was $0.25 in the clearance bin so I bought it!

I cut 2 small piece of the silver bead and a cute ribbon to match. See how I Criss crossed the beads so I could tie the ribbon around it?

and..... TADA, cute huh?
Close-up of back view
Close up of side view

I think this is the second view of the back. Oh well.:)
I love this picture! So sweet. Aren't we all lucky to be blessed with children?